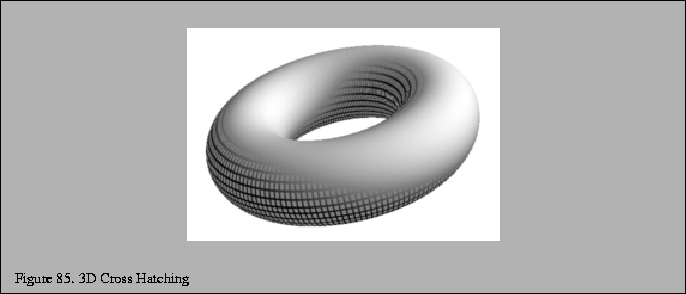
In [85], Saito suggests using cross-hatching to shade 3D geometry to provide visual cues. Rather than performing 2D hatching using a fixed screen space pattern (e.g., using polygon stipple) an algorithm is suggested for generating hatch lines aligned with parametric axes for the object (for example a sequence of straight lines traversing the length of a cylinder, or a sequence of rings around a cylinder).
A similar type of shading can be achieved using texture mapping. The parametric coordinates of the object are used as the texture coordinates at each vertex and a 1D or 2D texture map consisting of a single stripe is used to generate the hatching. This method is similar to the methods for generating contour lines in Section 6.14, except the iso-contours are now lines of constant parametric coordinate. If a 1D texture is used, at minimum two alternating texels are needed. A wrap mode of GL_REPEAT is used to replicate the stripe pattern across the object. If a 2D texture is used then the texture map contains a single stripe. Two parametric coordinates can be cross hatched at the same time using a 2D texture map with stripes in both the s and t directions. To reduce artifacts, the object needs to be tessellated finely enough to provide accurate sampling of the parametric coordinates.
This style of shading can be useful with bilevel output devices. For example, a luminance hatched image can be thresholded against an unlit version of the same image using a max function. This results in the darker portions of the shaded image being hatched, while the brighter portions remain unchanged as shown in Figure 85. This idea is generalized to the notion of a 3D halftone screen in [41].

Traditionally, halftones are generated by thresholding an
image against a halftone screen. Graphics devices such as
laser printers can approximate the variable width circles
used in halftones by using circular raster patterns.
Such patterns can be generated using a clustered-dot ordered dither
[27]. An
![]() dither pattern can be represented
as a matrix. For dithering operations in which the number
of output pixels is greater than the number of input pixels
i.e., each input pixel is converted to a
dither pattern can be represented
as a matrix. For dithering operations in which the number
of output pixels is greater than the number of input pixels
i.e., each input pixel is converted to a
![]() set of output
pixels, the input pixel is compared against each element
in the dither matrix. For each element that the input pixel
is larger than the dither element, a 1 is output, otherwise
a 0. An example
set of output
pixels, the input pixel is compared against each element
in the dither matrix. For each element that the input pixel
is larger than the dither element, a 1 is output, otherwise
a 0. An example
![]() dither matrix is:
dither matrix is:

Alternatively, the subtractive blend function can be used to do the thresholding instead of the accumulation buffer if the imaging extensions are present. If the input image is not a luminance image, it can be converted to luminance using the techniques described in Section 13.2.4 during the transfer to the framebuffer. If the framebuffer is not large enough to hold the output image, the source image can be split into tiles which are processed separately and merged.