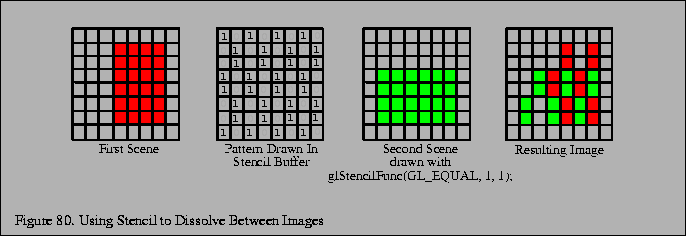
Stencil buffers can be used to mask selected pixels on the screen. This allows for pixel by pixel compositing of images. You can draw geometry or arrays of stencil values to control, per pixel, what is drawn into the color buffer. One way to use this capability is to composite multiple images.
A common film technique is the ``dissolve'', where one image or animated sequence is replaced with another, in a smooth sequence. The stencil buffer can be used to implement arbitrary dissolve patterns. The alpha planes of the color buffer and the alpha function can also be used to implement this kind of dissolve, but using the stencil buffer frees up the alpha planes for motion blur, transparency, smoothing, and other effects.
The basic approach to a stencil buffer dissolve is to render two different images, using the stencil buffer to control where each image can draw to the framebuffer. This can be done very simply by defining a stencil test and associating a different reference value with each image. The stencil buffer is initialized to a value such that the stencil test will pass with one of the images' reference values, and fail with the other. An example of a dissolve part way between two images is shown in Figure 80.

At the start of the dissolve (the first frame of the sequence), the stencil buffer is all cleared to one value, allowing only one of the images to be drawn to the framebuffer. Frame by frame, the stencil buffer is progressively changed (in an application defined pattern) to a different value, one that passes only when compared against the second image's reference value. As a result, more and more of the first image is replaced by the second.
Over a series of frames, the first image ``dissolves'' into the second, under control of the evolving pattern in the stencil buffer.
Here is a step-by-step description of a dissolve.
For this example, we'll have the stencil test always fail, and set the stencil operation to write the reference value to the stencil buffer. Your application will also need to turn on stenciling before you begin drawing the dissolve pattern.
If each new frame's dissolve pattern is a superset of the previous frame's pattern, image 1 doesn't have to be re-rendered. This is because once a pixel of image 1 is replaced with image 2, image 1 will never be redrawn there. Designing the dissolve pattern with this restriction can improve the performance of this technique.