The purpose of this document is to quickly get you started with OpenGL programming in Linux.
This is not meant to be a complete tutorial or reference. For those, look in:
To compile and run OpenGL programas, you'll need a number of libraries, but the must-have are:
In this mini-tutorial, we'll use GLUT. This allows us to quickly develop without worrying with window creation/handling issues and also to write source code that will be mostly portable (ie, will run unmodified on Windows/Linux/Mac/etc).
All OpenGL programs must include the headers for the above libraries, as follows:
#include <GL/gl.h>
#include <GL/glu.h>
#include <GL/glut.h>
Please download and use this Makefile. It allows easy compilation of C and C++ code, assuming that the file suffixes are correct (.c for C, .cc or .cpp for C++).
For most purposes, a single window is enough. Usually we'll want to specify the window size (and maybe position), which ideally should be done before the creation.
Most people do it in the main function, before anything else:
int main(int argc, char **argv)
{
	glutInitDisplayMode( GLUT_RGB | GLUT_DOUBLE );
	glutInitWindowSize( 500,500 );
	glutCreateWindow( "Test" );
	glutMainLoop();
}
glutInitDisplayMode( GLUT_RGB | GLUT_DOUBLE)Initial parameters for the display. In this case, we are specifying a RGB display (GLUT_RGB) along with double-buffering (GLUT_DOUBLE), so the screen won't blink when we redraw it.
glutInitWindowSize( 500,500 )Initial window size - width, height
glutCreateWindow( "Test" )Creates and sets the window title
glutMainLoop()Starts the main event loop - more on this later
There's not much point in running this code, as there will be nothing to be seen... So, let's draw something.
OpenGL supports a number of drawing primitives: points, quads, triangles, etc. But in order to draw them, we must create a drawing function. You can't simply call the drawing routines from anywhere on your program! So let's start with something really simple: a triangle
void draw()
{
	glClearColor( 0, 0, 0, 0 );
	glClear ( GL_COLOR_BUFFER_BIT );

	glColor3f( 0, 1, 0 );
	glBegin( GL_TRIANGLES );
	  glVertex2f( 0,0 );
	  glVertex2f( 1,0 );
	  glVertex2f( 0.5,1 );
	glEnd();
	glutSwapBuffers();
}
That's a lot of stuff just to draw a triangle! But we're doing more here:
glClearColor( 0,0,0,0 )This sets the color to fill the background (specified in R, G, B as floating point values in the range 0..1)
glClear( GL_COLOR_BUFFER_BIT )This effectively fills the background with the color set before. GL_COLOR_BUFFER_BIT informs OpenGL what we want to clear, in this case, just the image - more on this later
glColor3f( 0,1,0 )This sets the color for further drawing. The suffix "3f" means color is specified as three floating point values, so we are using green here
glBegin( GL_TRIANGLES )This starts a new drawing primitive. In this case, one or more triangles (GL_TRIANGLES).
glVertex2f( 0,0 )This is the first vertex (0,0). Remember the naming convention in glColor3f ? Now it's "2f" - two floating point values - meaning x and y
glVertex2f( 1,0 )This is the second vertex (1,0)
glVertex2f( 0.5,1 )And this is the last one (0.5, 1)
glEnd()You need to call glEnd() after the last vertex was sent
glutSwapBuffers()This must be the last call in the drawing function. It is needed when working with double-buffering, showing what was just drawn
We are almost there, now we need to inform glut which one is the drawing function. This is done in main, as follows:
int main(int argc, char **argv)
{
	glutInitDisplayMode( GLUT_RGB | GLUT_DOUBLE );
	glutInitWindowSize( 500,500 );
	glutCreateWindow( "Test" );
	glutDisplayFunc(draw);
	glutMainLoop();
}
Now it's time to see how this works! Please download the simple1.c program and compile it with "make simple1" (assuming you are using the provided makefile).
Look, a green triangle!
There are two things missing here:
In order to answer these questions, we'll need first to look at...
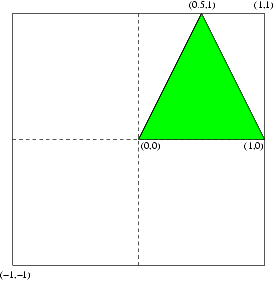
You have probably noticed that we used floating point coordinates in the range 0 to 1. This is because OpenGL implements a default window-to-viewport transformation that maps the entire screen window to the range -1..1 (see figure below). Ok, so this explains why the triangle was in the upper right corner. But how can we change this ?
Usually, you will want to use the following code:
int main(int argc, char **argv)
{
	...
	glMatrixMode( GL_PROJECTION );
	glLoadIdentity();
	gluOrtho2D( 0,1,0,1 );
	glMatrixMode( GL_MODELVIEW );

	glutMainLoop();
}
Observe that this is in main(..), just before the glutMainLoop() call. Some people put this in the drawing function, but it is not recommended, unless you have a good reason! This works as follows:
glMatrixMode( GL_PROJECTION )This informs OpenGL that we are going to change the projection matrix
glLoadIdentity()This loads an identity matrix
gluOrtho2D( 0,1,0,1 )This sets the window limits - xmin,xmax,ymin,ymax. In this case, we're setting a window from 0..1, both in x and y.
glMatrixMode( GL_MODELVIEW )This informs OpenGL that we are going to change the modelview matrix
What's about all those matrixes ? OpenGL works by transforming stuff through the use of matrixes. As you probably know, this is an effective way to encode geometric tranformations. There are a number of matrixes, but we are mainly interested in two of them: projection and modelview. Projection regulates how the projection transformation will be performed - OpenGL ALWAYS work with three-dimensional viewing, the 2D viewing is just a special case. Modelview controls both modelling and viewing transformations.
So, we change the matrix mode to projection and we load an identity matrix to make sure nothing else will interfere with the transformation. Then we call the gluOrtho2D function, which sets an orthographic (2D) transformation. Finally, we move back the system to modelview, as this is the default matrix mode.
Exercise: Try adding those extra lines to the code and compiling it. Where is the triangle now ?
Now it is time to understand what the "event loop" is. GLUT is an event-based system: the user sets a number callback functions, which will be called by the system when the specified event occurs. For example, mouse movements, mouse button clicks, keys being typed, etc. We already know about a callback function, the display function. GLUT uses this callback when it needs to redraw the screen.
To experiment with this, let's first try to detect a keyboard event to allow the user to exit the program by pressing ESC (ASCII code 27):
void keyboard(unsigned char key,int x,int y)
{
	if(key==27) exit(1);
}
And of course, we need to tell GLUT which one is the keyboard callback:
int main(int argc, char **argv)
{
	...
	glutDisplayFunc(draw);
	glutKeyboardFunc(keyboard);
	...
	glutMainLoop();
}
Exercise: Make these changes to the code and compile it. Check if you can quit the program by pressing ESC
As you know, geometric transformations can be used to do a number of interesting and useful things. For example, instancing. Suppose you want to draw not one, but many triangles, in different locations. You can possibly calculate and find out the required coordinates for all vertexes, but this would surely be tiresome and repetitive. First, we need to modularize our code a bit, to make things easier. We'll create a tri() function, which draws... a triangle.
void tri()
{
	glBegin( GL_TRIANGLES );
	  glVertex2f( 0,0 );
	  glVertex2f( 1,0 );
	  glVertex2f( 0.5,1 );
	glEnd();
}
That's it, just the drawing code. Note that we also removed the glColor3f(..) call, to allow us to change the color at will.
Now we'll make some changes to the drawing function as well, calling tri() two times. But in the second time, applying a scaling transformation and changing the color:
void draw()
{
	glClearColor( 0, 0, 0 );
	glClear ( GL_COLOR_BUFFER_BIT );
	glPushMatrix();

	glColor3f( 0, 1, 0 );
	tri();
	glScalef( 0.5,0.5,1 );
	glColor3f( 1, 0, 0 );
	tri();

	glPopMatrix();
	glutSwapBuffers();
}
The glScalef( 0.5, 0.5, 1 ) call applies a scaling factor of 0.5 for x, 0.5 for y and 1 for z (not relevant in this 2D case). Note two new calls: glPushMatrix and glPopMatrix. When you use transformations in your code, it is usually a good idea to include these. Why ? Because every transformation changes the modelview matrix, so if you want to undo a transformation, you'll need a way to save the current matrix.
This is implemented as a stack of matrices: the current matrix is always at the the top of this stack, and glPushMatrix makes a copy of this matrix and stores it again at the top. If you later change the current matrix, you'll be changing only the top one (the copy). Thus when you want to restore the saved transformation, you only need to call glPopMatrix, which will remove the matrix from the top leaving you with the original, unchanged matrix.
Why a stack of matrixes ? Because sometimes you need to preserve some transformations, while you accumulate others. More on that later!
Exercise: Change your code and compile it. Why the second triangle isn't in the centre ? Is this expected ?
The easiest way to correct this is by using a translation transformation, which (hopefully) will put the red triangle back to the centre. So, you may write something like this:
void draw()
{
	glClearColor( 0, 0, 0 );
	glClear ( GL_COLOR_BUFFER_BIT );
	glPushMatrix();

	glColor3f( 0, 1, 0 );
	tri();
	glScalef( 0.5,0.5,1 );
	glTranslatef( 0.5,0.5,0 );
	glColor3f( 1, 0, 0 );
	tri();

	glPopMatrix();
	glutSwapBuffers();
}
The easiest way to understand OpenGL transformations is imagining them as changes to the coordinate system. So to understand what we have just done, look at the following figure:
The first transformation (middle image) scales the current coodinate system by half. Then the second one (right image) translates it by 0.5 units for both x and y. But the system has already been scaled, so the amount for this transformation is halved as well, resulting in a translation by 0.25 units.
Exercise: Figure a way to do the translation BEFORE the scaling. Obviously just changing the order won't work... Check that the result is the same.
Finally, let's see how rotation works. Rotation in OpenGL is specified through an angle of rotation and an axis of rotation. This allows great flexibility, but as we are working in 2D, we only need rotation around the Z axis - you can imagine the Z axis pointing outwards from the screen. The function is glRotatef(angle, x, y, z), where the angle is informed in degrees and x,y,z define the axis of rotation - in our case, Z: (0,0,1).
To see how this works, let's add a rotation just before drawing the second triangle:
void draw()
{
	glClearColor( 0, 0, 0 );
	glClear ( GL_COLOR_BUFFER_BIT );
	glPushMatrix();

	glColor3f( 0, 1, 0 );
	tri();
	glScalef( 0.5,0.5,1 );
	glTranslatef( 0.5,0.5,0 );
	glRotatef(45,0,0,1);
	glColor3f( 1, 0, 0 );
	tri();

	glPopMatrix();
	glutSwapBuffers();
}
Exercise: Add rotation to your code and run it. What is wrong ? Why did that happen ?
When using rotations (or scaling), remember that they affect objects by rotating vertexes around the origin. As our triangle has been defined in the upper-right quadrant - both x and y values are positive - the triangle effectively rotates around the first vertex.
To fix that, you must first translate the system so the triangle centre will be at (0,0), then rotate the system and finally translate it back to the original position. As the triangle vertexes are (0,0) (1,0) and (0.5,1), to find its centre you just need to average the vertex coordinates:
Centre x = (0 + 1 + 0.5) / 3 = 0.5
Centre y = (0 + 0 + 1) / 3 = 0.333
void draw()
{
	glClearColor( 0, 0, 0 );
	glClear ( GL_COLOR_BUFFER_BIT );
	glPushMatrix();

	glColor3f( 0, 1, 0 );
	tri();
	glScalef( 0.5,0.5,1 );
	glTranslatef( 0.5,0.5,0 );

	glTranslatef( 0.5,0.333,0 );
	glRotatef(45,0,0,1);
	glTranslatef( -0.5,-0.333,0 );
	glColor3f( 1, 0, 0 );
	tri();

	glPopMatrix();
	glutSwapBuffers();
}
Exercise: Change and compile the code again. Check that the rotation is now correct.
Updated on 06/04/04 - Now it works, but it is also getting a bit messy: a scale, two translations in a row, ... Would it be possible to make it simpler and easier to understand ? Sure. As the scale is meant to affect just the second triangle, we can move it AFTER the glTranslatef(0.5,0.333,0) call. By doing this, we can remove the first translation altogether:
void draw()
{
	glClearColor( 0, 0, 0 );
	glClear ( GL_COLOR_BUFFER_BIT );
	glPushMatrix();

	glColor3f( 0, 1, 0 );
	tri();

	glTranslatef( 0.5,0.333,0 );
	glScalef( 0.5,0.5,1 );
	glRotatef( 45,0,0,1 );
	glTranslatef( -0.5,-0.333,0 );
	glColor3f( 1, 0, 0 );
	tri();

	glPopMatrix();
	glutSwapBuffers();
}
To understand how this works, see the figure below. We have excluded the rotation, but the mechanism is the same. Also note that the green triangle is now centered in relation to the red one instead of being at the centre of the screen.
Now let's add more interaction: we want to redraw the window each time the user presses a key, and at the same time, increment the angle of rotation, so we will be able to see the triangle rotating. Looks difficult ? Not at all.
First we need a variable to hold the current rotation value. Let's call this "rot" and put it as a global variable in the code. This must be initialized with 0.
Then we need to change the draw(..) function, using this variable instead of the fixed 45 degrees angle:
...
#include <GL/glut.h>

int rot = 0;
...

void draw()
{
	glClearColor( 0, 0, 0 );
	glClear ( GL_COLOR_BUFFER_BIT );
	glPushMatrix();

	glColor3f( 0, 1, 0 );
	tri();

	glTranslatef( 0.5,0.333,0 );
	glScalef( 0.5,0.5,1 );
	glRotatef( rot,0,0,1 );
	glTranslatef( -0.5,-0.333,0 );
	glColor3f( 1, 0, 0 );
	tri();

	glPopMatrix();
	glutSwapBuffers();
}
Ok, now we need to detect a keypress, increment the rot value and redraw the screen. Wait, we already have a keyboard function, right ? So we only need to change it:
void keyboard(unsigned char key,int x,int y)
{
	if(key==27) exit(1);
	if(++rot>359) rot = 0;
	glutPostRedisplay();
}
The first line was unchanged, we still quit when the users presses ESC. If the key wasn't ESC, then we simply increment the rotation angle (keeping within 0-359). The last call is important: it instructs GLUT to call the display function again. Note: you can't call display(..) directly! This must be called by GLUT itself. Remember the event model: it is GLUT that decides WHEN things should happen, not you.
Exercise: Change the code, test it, make sure it works.
Further exercises:
Part two: Three-dimensional viewing
Last changed on 06/04/2004 by Marcelo Cohen